1.30.2010
raisin pie
At sixteen, I knew that I did not like raisin pie. I mean, seriously? Raisin pie? Who thinks of this stuff? I could just imagine it – all full of poop-like pellets of engorged raisins. No thank you. In fact, I knew all sorts of stuff that I did not like without even having to bother trying it. Pecan pie – gross. Green bell peppers – blech, just the smell was enough. Sloppy joes, lasagna, spaghetti, pizza – for the love of all that is holy, do not allow perfectly good food to touch tomato sauce!
Around that age, I flew from Anchorage to my little hometown in a tiny prop plane, just one seat in front of a scary raisin pie that was being lovingly transported by a devoted mom for her grown son’s birthday. By coincidence, this was not any old lady, but was in fact the grandmother of one of my best friends, and so also the mother of my best-friends’-raisin-pie-loving father. I, of course, was oblivious to all this, but I often think of it in retrospect as a lesson in behaving myself around everyone lest the nice lady behind me turn out to be my friend’s grandmother. I distinctly remember that moment of horror when she put the pieces together and announced that she remembered flying behind that “little redhead” and now, as it turns out, here I am. I had to frantically scan my memory to make sure that I hadn’t farted in her direction or stampeded over her in my rush to the door. Thankfully I had done neither, but let it be a lesson to me if I ever have the urge.
It also turns out that I was spending the night with my friend on the exact same day as her father’s birthday, and hence, the frightful unveiling of raisin pie. Now I was not at all the type to try new things, but by this point I had probably refused everything her poor mother had set in front of me on account of plausible onion contamination, and I was nearly old enough to understand that this was rude. So when it came time to pass around the celebratory pie, worthy of air transport, I knew I was required to squeak out a request for “a tiny sliver” and hope I could gag it down. It arrived, slight but not paper thin as I had hoped, jam packed with raisins. More raisins than one should eat in one sitting. I’ll tolerate the four raisins in my trail mix that I couldn’t quite avoid even though I purposely scooped toward the M&M heavy section, but fifty raisins? That’s a lot for one day. I didn’t know then that raisin pie is more often called Funeral Pie, but I definitely would have believed it, because getting served a piece makes you wish you were dead.
I wasn’t dead so I had no choice but to dig in and pray my gag reflex didn’t activate. I tentatively forked the tiny tip of the slice, maybe five raisins, unidentifiable goo connecting them and delicate crust above and below. I let the fork rest on my tongue as I slipped the pie from it, giving myself an extra second of the neutral taste of metal before the raisins hit my mouth, and when they did, holy smokes, it was not at all what I expected, instead, there was a winey robust flavor of concentrated grapes wizened and amplified, supported by melting fat and starch, cinnamon and cloves in the distance, and a tiny edge of acidity. It was, dare I admit to anyone, delicious – frightfully delicious for so humble a beginning. Let it be a yet another lesson to me – don’t refuse dessert worthy of air transport.
It has been 15 years since our first chance encounter, and I have neither seen nor heard from the elusive raisin pie since. It doesn’t pop up on your typical dessert menu, and whatever region with which it is affiliated must not be one where I’ve set up shop. I asked my friend about it, who asked her mom, who asked her grandmother, but the recipe had fallen into disuse and finally misplaced. Sigh. She kindly passed along a starting point, the filling for raisin bars, and I have worthy guides in James Beard, Marcia Adams, and the kitchen sisters. I pieced it together – raisins (many), a cornstarch thickener (sometimes flour), a slight hand with the pie spices, and a splash of acidity to balance the tooth jarring sweetness (sometimes fresh lemon juice but more often vinegar). It sets to rest any thought that rural food lacks sophistication - fully composed and balanced, but unlike the fusion food screeching away in urban bistros, quiet.
I spent some time setting up elaborate scientific tests for fancy substitutions, balsamic instead of white vinegar, bourbon instead of no bourbon. I even said out loud once (gasp!): “I don’t know why I’m even testing this. Obviously, balsamic is going to be better than white vinegar.” It wasn’t. At all. Kind of murky and muddy compared to the clean balance from that liquid that substitutes as glass cleaner. A humble reminder that when a whole lot of grandmas collectively get to work on a recipe - the fittest recipes getting passed along, the unfit discarded, the maybe fit changed, tweaked, improved and then passed – well, that’s a whole lot of evolution that it pays to believe in.
Raisin Pie
In Amish communities, raisin pie is called Funeral Pie. If you ask, you'll get this answer "it's served at funerals," which always strikes me as just a tiny bit funny, because it still terribly unclear why pie and not any other dessert, or given pie, why this one? In any event, it's an unfortunate name, because the pie itself, is pretty delicious.
Pie crust, for a two-crust pie
2 cups raisins
2 cups water
3/4 cup brown sugar
3 tablespoons cornstarch
1 teaspoon cinnamon
1/2 teaspoon allspice
1/4 teaspoon nutmeg
1/8 teaspoon salt
2 tablespoons white vinegar
grated orange peel, from one orange
2 tablespoons butter
Preheat oven to 450 degrees. In a medium sauce pan, combine raisins and 2/3 cup water. Bring to simmer, and cook at least 5 minutes. Alternatively, turn raisins to the lowest setting while you prepare your pie crust. Place pie crust in refrigerator to chill.
Whisk sugar, cornstarch, cinnamon, allspice, nutmeg, and salt together in a medium bowl. Stir in remaining 1 1/3 cup water until well combined. Add mixture to raisins, combine well, and return raisins to simmer. When mixture is bubbling and thick, remove from heat. Add white vinegar, orange peel, and butter. Stir until butter is melted and well combined. Allow mixture to cool to room temperature.
Turn mixture into a pastry-lined pie pan. Moisten the pastry edge and top with second pastry crust. Trim and crimp edges and cut slits on top.
Bake pie at 450 degrees for fifteen minutes. Lower temperature to 350 and continue to bake for 30 additional minutes or until pastry is nicely browned.
Serve warm or cold. James Beard likes it with aged cheddar. I like it with a finger of bourbon.
Sourcing: pie crust: mine! (I guess that's obvious given its sad state, but I'm totally working on it. My New Year's resolution is to conquer pie crust by year's end, and before you judge, note that I do still have eleven months. It could happen.). Also, Whole Foods: organic thompson raisins, organic brown sugar; Cream cornstarch; Penzey's: Vietnamese cinnamon, allspice, nutmeg; Hain sea salt; Whole Foods 365 Brand: organic white vinegar, organic unsalted butter; and organic blood orange peel.
11.26.2009
Sally Lunn
I have a thing about uncooked dough and not at all in a normal way. Chocolate chip cookie dough, the darling of dough lovers everywhere, doesn't thrill me at all. No, I love unsweetened dough - yeast breads, rolled egg pasta, biscuits, and above all else, pie crust. As a child, I would hover 2 centimeters from my grandmother's elbow as she rolled out a crust, willing her to turn the rolling pin a few more times until the crust was just too large for the pie pan, silently cursing the little tears that required a spare scrap to mend. When the crust was properly crimped, I could go in for the kill, snagging the remnants. She'd put up with me for a bit, but eventually I'd get cut off. I'd make myself sick she'd explain. As an adult, I can attest to her wisdom. Without a parental figure monitoring my dough consumption, I do indeed make myself sick. Every time.
S. caught on to my dough habits early, and now, when he makes cinnamon rolls, he thoughtfully saves the ends. Unfortunately, he also thinks the best delivery method is to yell, "heads up, dough head" and send it hurtling across the room. I have never caught a flying object in my life. The skills of tracking the velocity and arc of an incoming projectile, coordinating my hands to arrive at the intercept of said projectile, and grasping on interception were not ones I acquired in my youth. As such, I am always smacked in the chest with the chunk of dough, and it lands ingloriously on the floor. Regrettably for my pride, I still retrieve it (and quite frankly, feel thrilled at my good fortune).
When I was growing up, my mother bought Pantry Pride white bread, a baked product not unlike Wonder Bread. The great thing about it was that I could nibble off the crust and then compact the remaining bread into a walnut-sized ball in my tiny fists. Without the air pockets, it was a reasonable stand-in for my real true love. I learned, not at a terribly advanced age, that Wonder Bread achieves its ethereal and non-nutritive texture by using a recipe that is so sloppy wet that it gets poured into the bread pans rather than kneaded and cradled. It makes me feel a little queasy thinking about it now, and it did at the time too, but I couldn't quite argue with the result.
It may be (although it probably isn't the case) that Wonder Bread evolved from a Colonial American (and before that, British) bread recipe called Sally Lunn. It's so old that nobody even knows why it's called that, although a number of non-credible and unbelievable explanations will be breathlessly repeated if you ask someone familiar with the recipe. I'll refrain from repeating them, but I will say that this dough pours. Sort of. It moves at the speed of molasses, although it also has strings of bread doughy gluten that make it look much less like molasses than actual molasses. After it's glopped into the bread pan to rise, it slowly settles into itself until the top of the bread is perfectly unblemished and smooth. Quite pretty really.
My apple guy in Indiana used to refer to some varieties as Tweaners. I'd say, "What's this [unknown apple variety]?", and then he's say: "Oh, that's a tweaner," which wasn't terribly illuminating until he explained that it's a term for apples that are between a sweet and tart apple - like Braeburns or Honeycrisps. Just my kind of apple as it turns out. Anyway, if tweaner were a term for bread, I think Sally Lunn would be one of them. It's somewhere between a sweet, rich and celebratory bread like Italy's Panetonne and a hearty staple bread. Faintly sweet and light enough to enjoy as a treat, but not so rich as to preclude eating it on a Tuesday in November. The crust is tender and thin, the crumb almost cakelike, and the flavor winking toward fats - egg yolk and butter. Nowadays, I'm far too grown-up to consider smashing its tender interiour into a little ball of dough, but if you're so inclined, I bet it would work perfectly.
As it turns out, it also works perfectly as a base for french toast. S. made a batch this weekend with plenty of eggs and milk so each slice was drowned in batter. They fried up brown and crisp on the edges, the interior tender and full of custard. That night, we finished the rest with a garlicy tomato broth, and while Sally Lunn was quite at home in both settings, she really prefers breakfast. See for yourself.
Sally Lunn
from American Cookery, James Beard
1 package active dry yeast
1/4 cup warm water
1 3/4 cups milk
2 tablespoons sugar
4 tablespoons butter
1 1/2 teaspoon salt
2 eggs, well beaten
5 cups flour, approximately
Dissolve the yeast in warm water. Heat the milk to almost boiling, and pour over the sugar, butter, and salt in the mixing bowl. Cool. Sift the flour and beat the eggs slightly. When the mixture has cooled, stir in the yeast, eggs, and 3 cups flour. Add enoguh additional flour to make a soft dough. Place the dough in a buttered bundt mold, or divide in half and place in a buttered 9x5x3 -inch loaf pans. Let rise till double in bulk. Bake at 400 degrees 15 minutes, then reduce to 350 for another 15-18 minutes.
10.19.2009
apples, apples, apples, apples
S. and I made a trip out to the orchard last weekend, and as is always the case when I'm presented with a vast expanse of store-able foodstuffs, a primordial urge to hoard overtook me. I wanted every single apple on every single tree to be only for me. Happily S. was along to reassure me that four bushels would be quite enough apples for two people. For the past week, I've been processing apples every spare minute, and wishing I was processing apples every not-spare moment, but I think I have finally succeeded at getting them all "put up" for the winter. Final count: 11 pints of applesauce, 6 pints of apple butter, lots of dried apple rings, many strips of apple-strawberry fruit roll-ups, a freezer full of apple wedges (for Dutch apple pancakes and apple crisp this winter), and a half-bushel of Ida Reds still in the basement for eating up the normal way.
We headed home in S.'s pickup; the jump seats behind us piled with a winter's worth of apples. When we parked, I hopped out to claim my prizes - ripping open the back door a tad too hastily. After many bends in the road, potholes and bumps that are the stuff of Pittsburgh driving, my precious cargo had shifted. Right up against the door as it turns out. I stood there dumbly as the top bag fell toward me, spilling a multicolored waterfall of apples down my chest, bumping off the floorboards and my knees to the driveway. As the first bag emptied, it changed the balance of the bag below it, which slowly tipped itself, adding to the river of apples cruising down the driveway and into the street. Apples landed in gutters, came to rest behind the rear wheels of street-parked cars and met their demise beneath the tires of passing vehicles. I'd like to say that I was horrified and hastily tried to prevent the disaster, but my little brain didn't work that fast. I just stood there frozen, furiously trying to comprehend what all these red and yellow stimuli moving so quickly could possibly mean. It ended, not by any intervention on my part, but because every single apple on my side of the truck was now in the street.
So I made applesauce, which had been part of plan all along. The bruises were trimmed and fed to the compost, and the rest transformed to a tasty mush.
I won't insult anyone's intelligence by posting an applesauce recipe, but I am fond of an old-fashioned candy made from applesauce. It's an extra chewy, apple morsel with crunchy pecans and strong notes of caramel. The flavor has a lot of complexity, and I've even come around to how hard you have to work to get at it. These guys are really chewy. I just finished eating three in a row and now, when I pay attention, I can feel a dull ache in my jaw from the effort. No matter.
The Best of Shaker Cooking, Miller & Fuller
Note: These candies can slip toward cloying. To remedy, I add a teaspoon of fresh lemon juice and a small pinch of salt along with the vanilla after the candy is removed from the heat. Both are optional.
1 1/4 cup unsweetened applesauce
2 tablespoons unflavored gelatin
2 cups sugar
1 cup walnuts, pecans or butternuts
1 tablespoon vanilla
Confectioners' sugar
Strain applesauce - either force applesauce through a fine-meshed strainer (traditional) or process in a food processor until very smooth. Whisk gelatin into 1/2 cup applesauce. Allow mixture to sit at least 10 minutes while gelatin softens. Meanwhile, combine remaining 3/4 cup applesauce with sugar and bring to a boil over medium heat. Allow to boil 10 minutes. Whisk gelatin mixture into hot applesauce and simmer 15 additional minutes, whisking constantly. Remove from heat; stir in nuts and vanilla. Pour into a generously buttered 9x9 pan and allow to cool completely (several hours or overnight). Turn candy out of pan and cut into small, 1/2 inch squares. Roll in sifted confectioner's sugar. Wrap individually in wax paper if desired.
Sourcing: Homemade applesauce, Knox unflavored gelatin, Whole Foods 365 organic cane sugar, Penzey's vanilla extract, and Whole Foods 365 organic confectioners' sugar
10.13.2009
strattu
Thanks to some very clear instructions over at Hunter Angler Gardener Cook, I am the proud owner of 2.5 cups of tomato gold. I skinned, seeded, and pureed 15 pounds of Roma tomatoes from Simmons Farm, and then dehydrated the mix for three days until it had reduced to nearly solid, brick-red, tomato putty. It's tomato paste raised to the tenth power. I feel like I'm in for a year of extraordinary eating with these little beauties tucked away in my pantry. I won't go on and on, because Hank Shaw already wrote about conservas, knows tons more about them, and there's nothing worse than circular blogging. So go see him. I'll be here admiring my pantry.
10.10.2009
salt rising bread
It took a couple of tries, but I finally produced a presentable loaf of salt rising bread. I know I'm not supposed to compliment myself, but I have to say, I am feeling particularly competent after this amazing feat. I fear yeast breads in general, and salt rising bread requires even more skill than normal bread baking. I had to harvest my own leavener. All by myself. And I did. And it worked. And I am proud.
So salt rising bread is an interesting food stuff. Right now, I am saying interesting in the way that grandmothers do when you have presented them with a homemade gift, and they have no idea what it could possibly be. It's sometimes described as emitting a "unique" aroma, which in this case means an olfactory amalgam of unwashed feet, aromatic soft-rind cheeses, and rotten milk. The scent would appeal to those with a palate toward the funky and earthy - those lovers of Epoisses and Iberico ham. Although I aspire toward such a status, when I brought an unknown cheese, Morbier, to a picnic, unwrapped it and unleashed a torrent of spoiled flesh, roadkill, and abandoned salmon carcasses into the air, I nearly cried. (In my defense, I also think it sounds tasty when Peter Kaminsky describes true hams as smelling of "sweet decay ... a heady perfume, just this side of rancidness"(Pig Perfect).)
No worries though, much like Morbier, the aroma of salt rising bread is stronger than its flavor. Remarkably, it really doesn't taste out of the ordinary for a clumsy homemade bread. That is, any bread produced by a professional at the local bakery will be superior to salt rising bread even on a day that you completely nail it, but when you do nail it, it's not so terrible. The texture is a bit more dense than a typical yeast bread, but it isn't dry, and I even think it could possibly be tasty with a bowl of chili. Please restrain yourself from running to the kitchen to try this recipe that I have so whole-heartedly endorsed.
Really I made this bread simply to experience the triumph of leavening flour and water with zero teaspoons of baking soda and zero yellow packets of yeast pellets.
Before the widespread availability of commercial yeast (around 1850 in this country), home bakers had to coax bread leaveners from thin air. Sourdough starter is still relatively well known. It's produced by harvesting lactobacillus and wild yeast spores from the air. The starter for salt rising bread isn't as common; it coaxes the bacterium Clostridium perfringens from its natural habitat in grains. Most grains will contain a little starter colony and one need only provide those little dudes with liquid and a warm place to multiply. They're heat lovers and prefer things a little warmer than one might imagine. 100 degrees Fahrenheit makes them happiest, but they will do their thing 10-15 degrees cooler (albeit much slower), and can tolerate just a bit more heat.
Based on instructions from James Beard and the Shaker sisters, I coaxed my C. perfringens from a starter of stone-ground cornmeal and tepid milk. It's important to spring for organic here. It will be less likely to have the bacteria blasted out of it during processing. Then it just needs to stay warm. I am the proud owner of a snazzy new oven that has a setting as low as 100. The starter percolated quite nicely inside. My old oven only went down to 170, which is more typical, so other options include a dehydrator or yogurt machine (with thermostat control), or you could rest the container in a warm water bath.
Alternatively, the authentic way to nurture your colony is to heat rock salt in the oven and then nestle the crock with the starter in a bed of salt. Reportedly, the salt retains the heat well and will keep the starter cozy for 8-10 hours. As you might have gathered, it's probably this process that coined the name salt rising bread. It doesn't have anything to do with the salt in the bread, and clearly, has nothing to do with salt acting as a leavening agent.
Now, here's the tricky part. The size and quality of your bacteria colony will vary widely across cornmeal brands, the time it has sat on the shelf, and even seasons of corn. Furthermore, the rate at which it multiples will depend on the temperature regulation. Thus, instructions that say - keep starter in warm place for 6-7 hours - are full of it. There just isn't that type of precision here. I have cultivated an active colony in as little as 6 hours and as long as 48 hours. These bacteria will not be bent to my will. So the instructions should say - keep starter warm until small bubbles form on the surface (whenever that may be). When it's ready, and if I look closely, I can see new bubbles very slowly developing. (It reminds me of that green algae goo in a swamp.) At this point, it will have developed its "distinctive" aroma.
Once the colony is active, a new batch of milk along with salt, sugar and butter is fed to the starter and in (about) 2-4 hours the mixture will show signs of activity again. I don't always see big active bubbles on the surface during this stage so my strategy has been to give the mixture a gentle stir and then put my ear right down by the bowl. If I hear little pops and fizzles, like very light carbonation, I proceed with the bread.
From here, it's pretty standard bread baking. Flour is added to the liquid, kneaded, allowed to rise once, shaped into loaves, allowed to rise a second time in the pan, and then baked. The part that is not standard is that, after kneading, your hands will smell like a barnyard and will resist all efforts toward sterilization. Just a heads up that weddings and wine tastings ought to be be scheduled for a different day.
Salt Rising Bread*
3 cups milk, warm
1/2 cup stone-ground cornmeal
1 1/2 teaspoons salt
2 tablespoons sugar
5 tablespoons butter, melted
5 cups flour
Mix one cup warm milk with cornmeal. Keep in a warm place until bubbles begin to form on the surface (6-48 hours). When starter is active, add 2 cups warm milk, salt, sugar, and butter. Stir to dissolve salt and sugar. Allow mixture to sit in warm place until small bubbles form (2-4 hours).
Mix in 4 cups of flour and turn out dough on floured surface. Gradually knead remaining 1 cup flour into dough and continue kneading until dough is very elastic, adding flour as necessary. The dough will always be somewhat sticky. Place dough in an oiled bowl and allow to rise for 2 hours. Divide dough into 2 parts, shape into loaves, and allow to rise in loaf pan until doubled in bulk.
Preheat oven to 375 degrees. Bake loaves at 375 for 15 minutes. Lower heat to 350 degrees and bake for 30 minutes longer. Turn out on cooling racks.
Sourcing: Natural by Nature grass-fed milk, Anselma stone-ground cornmeal, Hain sea salt, Whole Foods 365 Brand: organic cane sugar and organic unsalted butter, and King Arthur bread flour
* This is another recipe that is far too old for an attribution. It was common in this country in the 18th and early 19th centuries particularly in Appalachia, which makes sense because that area was settled by people from the British Isles. Salt rising bread was common in Scotland and Ireland. Although use of cornmeal as the starter obviously had to originate on this continent, harnessing C. perfringens for leavening was widely practiced in Europe. References to this bread making strategy date back to 17th century manuscripts, and of course, the technique was probably transferred via an oral tradition even before that.
9.19.2009
hot water and lard
I don't make pie crust, or rather, I don't make pie crust well. I do, however, make beautiful lard. So when I found a long-forgotten, break-all-the-rules recipe for a pie crust that calls for boiling water AND lard as the only fat, it was definitely for me. One variant of this recipe assures me that if it looks like grayish glue on first stir, not to worry! that's normal! Phew. I was going to be just fine.
I made a fruit pie first without consideration for proper flavor pairings. If you have lard that you like to open just to inhale its roasted pig aroma, then my hard-earned advice is that you not use it to make crust for a tart lemon pie. Just don't.
I was definitely on to something though. The crust was delicate, brittle, and rich with pig fat. It broke cleanly beneath my fork and melted into a crumbly mess of porcine-scented pastry in my mouth. James Beard (American Cookery) says the texture is "crumbly" rather than the more typical "flaky". I buy it, but right now, I'm just happy with a crust that doesn't have the texture of a teething biscuit.
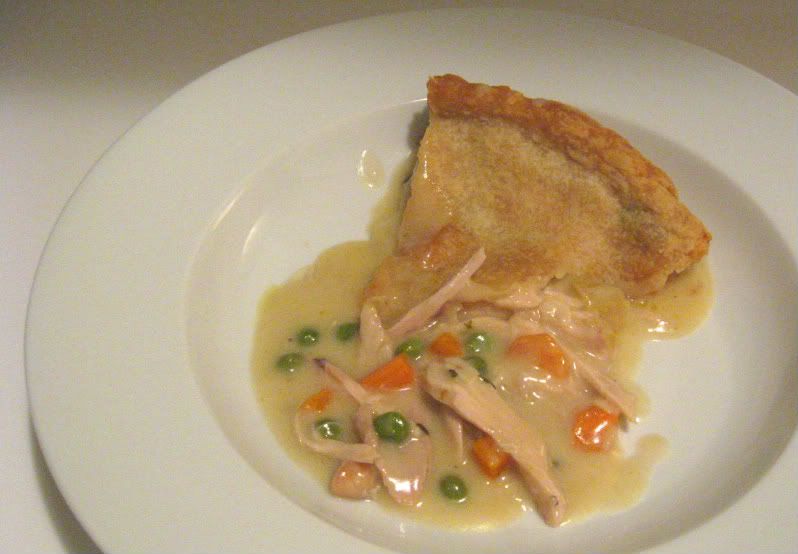
A reprise was in order - this time with a more savory filling like Shaker Chicken Fricassee. Chicken Fricassee is really intended to be served as a main course. The chicken pieces are seared first, braised in a rich broth, and then right before serving, that same broth is thickened with heavy cream to produce a sauce for the dish. All the components were right for a chicken pot pie with a few variations. I used a gravy preparation to further thicken the sauce so the crust wouldn't end soggy - first toasting some flour in equal parts lard, and then thickening the broth with this roux. A handful of fresh vegetables, nothing too fancy, and it was easily the best chicken pot pie I have ever eaten.
One thing I love about cooking is the little bits of knowledge you pick up from following a recipe. The instructions are always so pared down, a paint-by-numbers sort of communication, which leaves you to discover the bigger picture by yourself. I have always made chicken broth with the left over carcass of a roasted bird. The back bones, uneaten wings, and carved away breast bones partner with a quartered onion, carrot, and thyme. It makes really good chicken broth. But here, the broth is made with the whole bird - the gelatin-producing bones, all the rich dark meat, and pan seared skin - and it is something else entirely. I took a sip from a spoon to test how it was coming along, and it rocked my world in that close-your-eyes-so-your-tongue-isn't-distracted kind of way.
Just a word of warning. Despite the fact that this pie is extremely rich, it is also extremely delicious. I had planned to eat just one piece - expecting to be stuffed by the end of it. But, as you can see, even the best plans ...
Chicken Pot Pie
Adapted from The Best of Shaker Cooking, Miller and Fuller
S. and I easily finished off one pie between the two of us, but for the less gluttonous, I'm guessing this makes about 4 servings.
1/2 roasting chicken (about 2 lbs)
flour, up to 1/4 cup
5 tablespoon lard (or substitute vegetable oil and butter)
3 cups water
1 bay leaf
1/4 teaspoon ground pepper
2 sprigs thyme
1/4 cup chopped parsley
1 small onion, chopped
1 teaspoon salt
5 tablespoons flour
1/2 cup heavy cream, warmed
pie crust (see recipe below)
1 cup carrots, chopped and roasted
1 cup peas, fresh or frozen
Cut chicken half into breast, wing, thigh, leg and backbone pieces. Sprinkle liberally with salt and pepper and then dust lightly with flour. Shake excess flour from chicken pieces. Melt 1 tablespoon lard (or vegetable oil) in a saute pan and heat over medium heat. Sear chicken pieces until golden brown on all sides.
Add boiling water, bay leaf, pepper, thyme, parsley, onion and salt. Cover the pot and simmer gently until chicken is tender, 1 to 1 1/2 hours. Adjust seasonings to taste. Remove chicken pieces from broth. Strain chicken stock and reserve. Allow chicken pieces to cool slightly at room temperature. When cool enough to handle, remove meat from bones and coarsely shred.
Meanwhile, in saute pan, melt 4 tablespoons lard (or butter) over low heat. Stir in flour and cook gently for 5 minutes to remove raw flour taste. Do not brown. Gradually whisk warm chicken stock into flour mixture. Whisk constantly until flour mixture and stock are fully incorporated. Increase heat to medium and simmer sauce for 10 minutes until thick. Remove from heat. Whisk warmed heavy cream into sauce.
Fill pie crust with shredded chicken, carrots and peas. Pour sauce over meat and vegetables and top pie with second round of pie crust. Seal edges and cut vents in the top of the crust.
Place pie in preheated 375 degree oven and bake 45-55 minutes or until crust has browned and filling is bubbling through vents.
Sourcing: Local organic, free-range chicken, King Arthur all-purpose flour, home-rendered lard, Penzey's bay leaf and pepper, Whole Food organic thyme, parsley, white onion, carrots and peas, Hain sea salt, Natural-by-Nature heavy cream
Hot Water Pie Crust
from American Cookery, James Beard
If you fear lard, feel free to substitute a different crust recipe. For everyone else, try this once. It's really a cool recipe - unique, forgiving, delicious.
2 cups all-purpose flour
1 teaspoon salt
1/3 cup boiling water
2/3 cup lard, room temperature
Mix the flour and salt in bowl. Measure the boiling water into a measuring cup. Add lard and stir the mixture until lard has melted. Whisk until water and lard are well combined, then stir lightly with a fork into the flour and salt. The dough will be very soft and must be chilled at least 30 minutes before rolling out.
Sourcing: King Arthur all-purpose flour, Hain sea salt, and home-rendered lard
9.07.2009
wine jelly

I did not have my first jello shot until I was at least 24. A developmental milestone that passed me by during the typical jello-shot period given my unusual college experience. I quite deliberately chose a private university that prohibited Greek organizations and had a reputation for nerdy academic devotion. Dare I admit the rumor that Playboy once awarded it top-honors for "ugliest co-eds" - at least that's what they said and sometimes it was easy to believe. What I meant to explain is that I haven't actually consumed many jello shots, but I am at once fascinated by them and awful at making them. I know the recipe - "jello + water + lots of cheap vodka", but when you are 31-years-old and interested in making jello shots that is just sad enough on its own and would be worse if I did things the normal way. So I try to make "sophisticated" jello shots, and then I torture my friends with them. Among the disasters ...
(1) Irish Car Bomb Jello Shots: Guinness jello with a little nipple of jello Bailey's. Sorry guys.
(2) Whiskey Sour Jello Shots: Straight Jack jello "balanced" with so, so sour fresh lemon juice jello that nearly put my unsuspecting shot takers into an alcohol coma while it drilled an ulcer.
3. Screwdriver Jello Shots made with fresh orange juice that just wasn't strong enough to cover up the taste of meaty flavored cartilage.
This, of course, has in no way dissuaded me from my quest for the perfect I'm-not-a-frat-boy jello shot, but I admit, it should have. See, I have this recipe I clipped ages ago of this beautiful little glimmering cube of Gin & Tonic jello balanced on a thin slice of lime. It is so grown-up; I quiver along with its little shake. Yet each year when I decide to make jello shots (always for the Superbowl for some inexplicable reason), I cannot find this recipe, which was actually good enough to be published in a national food magazine, and then each year, I decide that anything can be a jello shot if I add gelatin and hence begins the mayhem.
Anyway, you are not going to believe this, but the Shakers share my jello shot fascination. I am not making this up. I can hardly believe that I'm not making this up, but I definitely am not. It seems the society wasn't adverse to knocking a few back. A 1787 anti-Shaker essay accuses them of referring to rum as the "Spirit of God." Of course, tracts meant to convince us that the Shakers are evil are not generally the best source of accurate historical information on typical alcohol consumption, but Stephen Stein, the eminent scholar on Shaker history and theology puts it this way:
The documentary record contains repeated counsel against the use of "spirits." As early as 1800 specific injunctions limited liquor to medicinal use. Even wine and cider were to be drunk sparingly, and then only in specified circumstances. (The frequency of these exhortations suggests that excessive drinking may have been a persistent problem in the villages.)
The Shaker Experience in America
He's so diplomatic. I wish I had that skill, but I clearly do not so I'm just going to imagine the kitchen sisters getting a little rowdy after supper instead. I like them already so it's totally endearing in my head.
Of course, they didn't call them jello shots, and they also didn't shoot them out of little dixie cups, but I have tried their little concoction, and it is definitely not for sissies. 19th century cookery had a thing for aspics (meaty) and jellies (fruity), and this is from the later category. Mary Whitcher, author of Shaker Housekeeper (1882), called this one Wine Jelly. It's a potent mixture of orange, lemon and raspberry juice, brandy and dry sherry, and stipulates a whopping one cup portion size. I did the math and that's a little over one standard alcoholic drink.
I have to say I'm puzzled by this treat. I really can imagine it being so so sophisticated - everyone sitting awkwardly in the drawing room eating company dessert in the company cut glass dishes. But with a texture identical to the glowing green jello blocks ubiquitous to summer camps, school lunches and hospital trays, it's hard not to associate this treat with your late zeros. I will say once you clear your head of all that and just get down to business with your wine jelly, it does have a flair of worldliness. The dominant flavor is brandy with its warm, vanilla toasty-ness, with gentle back up from the citrus. It truly does taste sophisticated enough to be served as a centerpiece, but we've probably been ruined by a preschool over-abundance of gelatin. Even so, it's an awesome conversation piece. Try it just once. While you might age out of Knox Blox, you're never too old for jello shots.
Wine Jelly
Mary Whitcher, Shaker Housekeeper
2 1/2 tablespoons granulated gelatin
1/2 cup cold water
1 2/3 cup boiling water
1 cup sugar
1/3 cup orange juice
3 tablespoons lemon juice
1/2 cup dry sherry
1/2 cup brandy
1 cup raspberries
Whisk gelatin into cold water and allow to soak until gelatin has absorbed the water and solidified (at least 5 minutes). Break gelatin into pieces and add to boiling water. Stir to dissolve. Add sugar, orange and lemon juice, sherry, and brandy. Stir until sugar dissolves. Press raspberries through sieve or cheesecloth to extract juice. Discard seeds and pulp and stir raspberry juice into gelatin mixture to color. Chill at least 4 hours or overnight to set. "Serves 4."
Sourcing: I have to admit that I'm not a huge fan of Sherry and only just now discovered that I like brandy so I have no idea if these brands are reputable or not. Anyway, I used Paul Masson VSOP Grand Amber Brandy and Pedro Romero Aurora Manzzanilla (dry sherry). Also, Knox Gelatin (unflavored), Whole Foods 365 Brand Organic Cane Sugar, fresh-squeezed organic orange and lemon juice (regrettably out of season), and raspberries I picked at a u-pick place in Ohio.
8.24.2009
graham nuts

I don’t like Grape-Nuts. For the first three minutes, they’re unchewable pebbles of gravel, and then after three minutes and one second, they absorb all of the milk and transform into a gum-able mush. I’m not quite sure how they convert themselves so quickly from one inedible texture to an entirely different inedible texture, but by some feat of engineering it is so. Plus, they taste bad.
You would think that grape nuts were an invention of our food-product, soy+corn system, but they’re actually predated by a home-cooked version. I love home-cooked versions – even, it turns out, of stuff I don’t love. So when I found “Graham Nuts” in a cookbook on Indiana Amish cookery, it was on. It had to be. First, I can’t help making things that are irrational to produce at home, and cold cereal falls delightfully within that category. Second, my mother gave me a meat grinder for my birthday. Obviously I'm going to make any recipe that requires a meat grinder.

Here's how it goes - a biscuit-like dough is baked in a big patty, and then the patty is ground (with my brand-new meat grinder!), and those crumbs are then baked again at a low temperature until a crunchy (but not gravel-like) cold cereal emerges. I’m telling you, with a proper religious conversion and a wringing of my feminist politics and love for electricity, I could so be Amish. Well, actually, as Christian separatist sects go, I’d rather be Shaker (they have better banisters), but I am good with Amish cold cereals so I’m just saying.
Here’s the thing about homemade Graham Nuts as compared to store bought Grape-Nuts: they taste good - a clean blend of whole wheat, molasses-tinged brown sugar, and buttermilk. On your tongue, it tastes as it is – hearty sweet biscuit crumbs dehydrated to preserve and salvaged for a second tasty breakfast. I am unnaturally delighted to open my cupboard and find them sitting by the boxes of cold cereal – stalwart little soldiers of “olden times” America, little pieces of edible archeology.
Graham Nuts
Adapted from Cooking from Quilt Country, Marcia Adams
I know meat grinders are not standard kitchen utensils any longer so I tried this with a Cuisinart too. It works great. The pieces are more standardized with a grinder, but exactly as delicious without one.
3 ½ cups whole wheat flour
3/4 cup brown sugar
1 teaspoon salt
1 teaspoon baking soda
1 teaspoon cinnamon
2 cups buttermilk
2 teaspoons vanilla extract
Preheat oven to 350 degrees. Whisk together flour, brown sugar, salt, baking soda and cinnamon. Add buttermilk and vanilla; stir to blend. On a greased baking sheet, spread dough evenly. Bake for 20-25 minutes until patty is firm and lightly browned around the edges. Cool patty on a rack.
When patty has cooled to room temperature (it can sit uncovered overnight if necessary), break it into small chunks and feed through a meat grinder. Alternatively, small batches can be pulsed in a food processor. Divide crumbs evenly between two large pans (don't crowd them). Bake at 275 degrees for 30 minutes, stirring frequently. Let cool and enjoy with milk or yogurt.
Sourcing: King Arthur Whole-Wheat Flour, Whole Foods 365 Brand Organic Brown Sugar, Hain Sea Salt, Arm & Hammer Baking Soda, Penzey’s Vietnamese Cassia Cinnamon, Natural-by-Nature Grassfed Buttermilk, and Penzey’s Vanilla Extract
8.11.2009
Way Weird Chocolate Pudding
In the early nineties, S.'s family switched to real Parmesan cheese. The kind that comes in a wedge and requires grating at home. It was a paradigm shift repeated in households across the country, and in many presumably before then, but in our small fishing town on the southern coast of Alaska, I suspect they were among the first. It was quite a sensation. His Mom's homemade fettuccine simply dressed with olive oil and real Parmesan was so good that it gave me the courage to try an even weirder cheese .... feta.
S. was a high school athlete, and in Alaska, this entailed considerable travel. The closest high school with which to compete was an hour and half away by road, and in our seven school "region", the furthest was a 6.5 hour ride. These long trips served to establish a high school bus culture in which completely harmless hijinx were deemed impressively risque by our small-town estimation. It was on one such trip that S. reached into his bus larder to pull from it a container of his mother's homemade pasta garnished impressively with delicate shreds of real Parmesan. This decidedly sophisticated snack worthy of admiration was instead met quizzically and with the final pronunciation that S. ate "way weird Parmesan." Not surprisingly, this became a badge of honor among his family, and to this day, sometimes when it is required, the applicant requests the "way weird Parmesan" to be passed.

Strangely, I'm not here to write about cheese. I did, however, recently have a run in with a completely wacky recipe that shifted my world view of pudding. It reminded me of that story. Now perhaps you (my sole reader. Hi Mom) have a more sophisticated view of pudding, but mine, I've learned, was narrow. Narrow like a green can of dry, cheese-scented sawdust. This new pudding recipe was different. A thick, egg-less brownie batter is topped with a dry sugar mixture, and then, boiling water is poured over the whole thing. Crazy, I know. Somehow during baking, the brownies (on the bottom) rise to the top to blanket the dish with a thin, crackly brownie skin protecting a lake of perfectly melty warm chocolate pudding beneath it. With a flick of the wrist, it can be served with the pudding back on the top lazily running down the brownie to pool at the bottom of the bowl. It is way weird in the very best possible way.

I suppose I could try to fancy this up with a dollop of whipped cream or a little scoop of ice cream, but I'm not really tempted. I like it the way it is - rough and goopy. It's not company food. Rather, I usually throw it together 45 minutes after that healthy dinner I was so proud of proves itself to be unsatisfying. It's ready about halfway through the second episode of my Battlestar Galactia binge, and if I'm lucky, I'll be hungry enough for a second bowl toward the end of the fourth episode. Conveniently, I usually have the ingredients on hand so this rustic treat is always lurking somewhere in my cupboards.

Way Weird Chocolate Pudding
Adapted from Cooking from Quilt Country, Marcia Adams (and common in other sources)
I've reduced the sugar from the published recipe (holy sweet tooth) and also replaced the boiling water with hot coffee. The coffee doesn't add a strong flavor, but the bitterness provides a better balance. Don't hesitate to try the recipe with boiling water instead for a more authentic experience.
1 cup flour
2 teaspoons baking powder
1/2 teaspoon salt
1/2 cup sugar
7 tablespoons cocoa powder
1/2 cup milk
2 tablespoons butter, melted
1 teaspoon vanilla extract
2/3 cup brown sugar
1 1/2 cups hot coffee
Preheat oven to 350 degrees. In medium bowl, whisk together flour, baking powder, salt, sugar and THREE tablespoons only of the cocoa powder. Add milk, melted butter, and vanilla to dry ingredients and mix to incorporate. It should form a thick, brownie-like batter. Spread batter evenly over the bottom of a greased 10x6, 9x7 or 8x8 baking dish.
Next, mix remaining 4 tablespoons of cocoa powder with brown sugar to blend and sprinkle dry mixture over batter. Finally, pour hot coffee evenly over sugar mixture. Do not mix! Carefully transfer to the oven and bake 40 minutes. When finished, the top of the dish will appear firm, like a pan of brownies, but it will be hiding a thick layer of gooey pudding beneath it.
Allow to stand at least 10 minutes after removing from oven, but do serve this dish warm. Unlike typical puddings, it dulls a bit at cold temperatures.
SOURCING: King Arthur Unbleached All-Purpose Flour; Clabber Girl Baking Powder; Hain Sea Salt; Whole Foods 365 Brand: Organic Cane Sugar, Dark Brown Sugar, and Unsalted Butter; Penzey's Natural Cocoa Powder; Natural-by-Nature Fat Free Milk; Penzey's Vanilla Extract; and Kaladi Brothers coffee (weakly brewed)
S. was a high school athlete, and in Alaska, this entailed considerable travel. The closest high school with which to compete was an hour and half away by road, and in our seven school "region", the furthest was a 6.5 hour ride. These long trips served to establish a high school bus culture in which completely harmless hijinx were deemed impressively risque by our small-town estimation. It was on one such trip that S. reached into his bus larder to pull from it a container of his mother's homemade pasta garnished impressively with delicate shreds of real Parmesan. This decidedly sophisticated snack worthy of admiration was instead met quizzically and with the final pronunciation that S. ate "way weird Parmesan." Not surprisingly, this became a badge of honor among his family, and to this day, sometimes when it is required, the applicant requests the "way weird Parmesan" to be passed.

Strangely, I'm not here to write about cheese. I did, however, recently have a run in with a completely wacky recipe that shifted my world view of pudding. It reminded me of that story. Now perhaps you (my sole reader. Hi Mom) have a more sophisticated view of pudding, but mine, I've learned, was narrow. Narrow like a green can of dry, cheese-scented sawdust. This new pudding recipe was different. A thick, egg-less brownie batter is topped with a dry sugar mixture, and then, boiling water is poured over the whole thing. Crazy, I know. Somehow during baking, the brownies (on the bottom) rise to the top to blanket the dish with a thin, crackly brownie skin protecting a lake of perfectly melty warm chocolate pudding beneath it. With a flick of the wrist, it can be served with the pudding back on the top lazily running down the brownie to pool at the bottom of the bowl. It is way weird in the very best possible way.

I suppose I could try to fancy this up with a dollop of whipped cream or a little scoop of ice cream, but I'm not really tempted. I like it the way it is - rough and goopy. It's not company food. Rather, I usually throw it together 45 minutes after that healthy dinner I was so proud of proves itself to be unsatisfying. It's ready about halfway through the second episode of my Battlestar Galactia binge, and if I'm lucky, I'll be hungry enough for a second bowl toward the end of the fourth episode. Conveniently, I usually have the ingredients on hand so this rustic treat is always lurking somewhere in my cupboards.

Way Weird Chocolate Pudding
Adapted from Cooking from Quilt Country, Marcia Adams (and common in other sources)
I've reduced the sugar from the published recipe (holy sweet tooth) and also replaced the boiling water with hot coffee. The coffee doesn't add a strong flavor, but the bitterness provides a better balance. Don't hesitate to try the recipe with boiling water instead for a more authentic experience.
1 cup flour
2 teaspoons baking powder
1/2 teaspoon salt
1/2 cup sugar
7 tablespoons cocoa powder
1/2 cup milk
2 tablespoons butter, melted
1 teaspoon vanilla extract
2/3 cup brown sugar
1 1/2 cups hot coffee
Preheat oven to 350 degrees. In medium bowl, whisk together flour, baking powder, salt, sugar and THREE tablespoons only of the cocoa powder. Add milk, melted butter, and vanilla to dry ingredients and mix to incorporate. It should form a thick, brownie-like batter. Spread batter evenly over the bottom of a greased 10x6, 9x7 or 8x8 baking dish.
Next, mix remaining 4 tablespoons of cocoa powder with brown sugar to blend and sprinkle dry mixture over batter. Finally, pour hot coffee evenly over sugar mixture. Do not mix! Carefully transfer to the oven and bake 40 minutes. When finished, the top of the dish will appear firm, like a pan of brownies, but it will be hiding a thick layer of gooey pudding beneath it.
Allow to stand at least 10 minutes after removing from oven, but do serve this dish warm. Unlike typical puddings, it dulls a bit at cold temperatures.
SOURCING: King Arthur Unbleached All-Purpose Flour; Clabber Girl Baking Powder; Hain Sea Salt; Whole Foods 365 Brand: Organic Cane Sugar, Dark Brown Sugar, and Unsalted Butter; Penzey's Natural Cocoa Powder; Natural-by-Nature Fat Free Milk; Penzey's Vanilla Extract; and Kaladi Brothers coffee (weakly brewed)
8.04.2009
Angel Cream

If you have not seen Waitress, I suggest that you do not. I spent much of the movie wondering if it would be over soon and snorting over the predictable plot. The truth is that it actually has several threads that are not typical at all, but it seemed as if I had seen it all along. Despite my whining, there was one good thing about the film. Sensual pie making cinematography. Really. It's terribly sexy. The camera is directly overhead; the pie fills the frame, and the action is soft and seductive - draping supple crusts, milky filling poured slowly with quiet purpose. Partially because the scenes are shot as if you are looking down at your own work, I came to believe that I can bake pies. I cannot.
Rather, I cannot make pie crust. When a gift of lemons arrive from S.'s grandparents' tree, he sets to making a lemon meringue. Each time, I gravely inform him that pie crust is hard. It's true. The directions always sternly warn of overworking the crust with no clear indication of how one tells that a dough is correctly "worked" and when it tips over that feared precipice toward "overworked". It's all meaningless to the uninitiated. S., however, makes perfect pie so when I informed him that I was making pie, he helpfully offered to make the crust knowing full well that I had no idea what I was doing. I turned him down with new found Waitress confidence. I could totally picture my slow motion pie technique, and it was awesome.

Except it wasn't. That night, three bites in, the crust thick and soggy on top, ziewback hard on the bottom, I turned to S. to say that this particular pie crust was the worst pie crust I had eaten in my entire life. He didn't say a word, just started whistling a happy little tune and looking innocent and unopinionated.
So I can't make crust, but don't hold it against the Angel Cream Pie. How could you really? I completely fell for it when the instructions quite literally stated that the pie should be baked until "lightly brown on top (golden like an angel)." I love it. I'm kind of clueless about what shade of golden angels typically are, but I love that the Shakers were quite confident of the precise hue of gold to which that directive refers, which leads me right back to the place I often begin - Shakers. They are awesome. This particular pie is yet another reason why. It's milky sweet, a lightly set custard with a subtle bitterness to balance the sugar and a familiar floral scent that becomes immediately recognizable when a mouthful of roses melts on your tongue. A rose scented pie. Really. When I read this recipe, I was impressed that this self-sufficient little sect felt rose water to be a vital commodity worthy of acquiring from Europe. That was before I learned that they distilled it themselves. I mean it's not like I didn't already think they were awesome, and now they're distilling rose water all by themselves! I can hardly hide my adoration (or desire for distilling equipment and an acre of roses). Thankfully the Shakers are mostly dead, because I would not want them to have to meet me.

Despite my status as the Shaker's biggest non-chair-related fan, I was left with the problem of horrible crust not befitting Angel Cream so I ditched the crust and ever so slightly reworked the recipe into little pots de cremes (sort of). Angel Cream seems almost modern in these diminutive little vessels, and I love how it nudges you toward small savored tastes. Served with a sprinkling of candied rose petals and prevented from browning "like an angel", it looks just as it tastes.

Angel Cream
from The Best of Shaker Cooking
2 cups heavy whipping cream
1/2 cup sugar
2 tablespoons flour
1/8 teaspoon salt
2 teaspoons rose water
2 eggs, whites only
Preheat oven to 350 degrees.
Heat cream over low heat until warm but not scalding. Whisk together sugar, flour and salt. Stir in cream and add rose water. Stir until sugar dissolves. In a separate bowl, whip egg whites until they hold a soft peak and gently fold into cream mixture.
Pour filling into 8 custard dishes - filling each nearly full (they don't rise much). Place dishes into a large baking pan and fill pan with water until the level reaches halfway up the sides of the custard dishes. Cover pan with foil. Bake for 40 minutes or until sharp knife inserted into filling comes away clean.
Allow custards to cool and serve. If refrigerated, prior to serving, take the chill off by allowing to sit at room temperature for 10-15 minutes. If desired, garnish with candied rose petals
Sourcing: Natural by Nature Grass-Fed Heavy Cream, Whole Foods 365 Organic Cane Sugar, King Arthur Unbleached All-Purpose Flour, Hain Sea Salt, Heritage Products Rosewater, Champion Chicks eggs
Candied Rose Petals
1 rose
1 egg white, beaten
white sugar
Remove petals from rose. Brush each petal with egg white and then sprinkle with sugar, shaking off excess. I found I could get the most even coverage by placing the sugar in a sieve and then gently tapping it over the petals. Arrange on wax paper and allow to dry at room temperature. Drying time will depend on humidity, but should take around 24 hours. Rose petals can be stored in tightly covered container for 1 week at room temperature.
Sourcing: Domino Sugar (a bleached sugar will look prettier here than organic) and Champion Chicks egg. For the rose, I'd suggest an organic one. They're harder to find, but pesticides for the cut flower industry aren't required to be safe for consumption. We don't usually plan on eating them after all.
7.22.2009
Laundry Soap

May I attempt to dissuade you from making your own laundry soap?
(1) Laundry soap is too inexpensive to consider the hassle of an unnecessary extra weekend task.
(2) Homemade laundry soap requires extra steps to avoid soap scum, the anathema of all pre-detergent laundresses.
(3) Homemade laundry soap has a blobulous texture not unlike the liquid secretions of roasted chicken thighs solidified at room temperature.
(4) You will be unable to account for an hour of time to friends and family. It is best that you don't admit you were busy making laundry soap as if you were deposited here from 1850.
Not dissuaded? Cool. Me neither.
So just to be clear - there really is no good reason to make your own laundry soap. Here's what you'll need.
(1) One bar of soap (4-6 oz)
It has to be real soap and not detergent. If it doesn't say "soap" or "100% castile" on the label, it's probably not soap. Common brands include Kirk's Castile Soap, Dr. Bonner's bar soaps, and Sappo Hill. I have the best luck finding these in the hippy aisle; although, I find Kirk's with the regular detergent bars fairly often. Your friendly artisan soap maker down at the farmers' market would also be happy to sell a bar of soap.
(2) Washing soda
This is not the same as baking soda. Arm & Hammer makes the most widely distributed washing soda. If a store has it, it will probably be in the laundry aisle - hanging out around perfectly good laundry detergent that you could just buy and save yourself the hassle of tracking down these obscure ingredients. Or not. It's up to you.
(3) Borax
This usually lives in the laundry aisle right next to the washing soda or sometimes in the pest control section.

(4) A one-gallon container
Mine is from the Home Depot paint aisle.
First, shred the soap with a cheese grater. This happens to be a reject bar of soap that I also made myself. There's nothing like extending your favorite wasting-my-time-making-something-any-idiot-would-buy-at-Target task by preceding it with another task from the exact same category.

Next, pour a kettle of boiling water over shreds and resist the temptation to stir. Stirring will cause the shreds to clump up in a collective effort to resist disintegrating.

Go about your non-prairie-dress-wearing life until the water has cooled to room temperature. At this point, a little stirring should result is a fairly homogeneous soap stew. Transfer to your laundry bucket and add enough water to measure one gallon total.

To this watery soap mixture, add 1/2 cup Borax and 1/2 cup washing soda. Now is the time to stir. A lot. The mixture will transform from a watery soup to a thick gelatinous bucket of goop. The borax and washing soda will look clumped and suspended initially, but should integrate after a bit. It's fine if a few specks remain.

After a few hours of rest, it will completely set up and look like this:

There is one complication. One of the great things about synthetic detergents is that they don't produce soap scum. Soap does, and it's not good for your washer. To avoid this, I add 1/4 to 1/2 cup of white vinegar to my rinse cycle. It prevents soap scum, and it also functions as a fabric softener. Thankfully, the scent dissipates quickly, and my linens have yet to come out smelling like pickles. I am the proud new owner of a washing machine with a fabric softener dispenser so I use that for the vinegar (instead of waiting around for the rinse cycle), but my old washer was not quite so fancy so I used a Downy ball instead.
I like 1/2 cup of detergent for a large load combined with a 1/4 cup of vinegar for the rinse cycle.
Oh, and I know I said there was no good reason to make your own laundry soap, but there actually is one. It makes your clothes really, really soft.
Laundry Soap
4-6 oz bar of soap
4 cups water, boiling
12 cups water, tap
1/2 cup Washing Soda
1/2 cup Borax
Shred soap with a cheese grater. Bring 4 cups of water to boil and pour over soap shreds. Do not stir. When water has cooled, mix until the soap shreds and water are completely blended. Transfer mixture to a container that can hold at least 1 gallon. Add 12 cups of tap water to soap mixture and stir to incorporate. Add Washing Soda and Borax and stir until mixture solidifies.
For large load of laundry, use 1/2 cup laundry soap. Add 1/4 cup vinegar to rinse cycle.
4.17.2009
yogurt all by myself

I thought making yogurt would be a complicated task requiring special equipment and mail ordered "cultures". It isn't. It's easy.
Here's what you need: one quart of milk and one container of yogurt.

Check to make sure that the yogurt contains active cultures, and then check to make sure that you want to eat the rest of it. You'll only need 2 tablespoons of yogurt to start a batch; the rest is for a snack. If you don't want to eat the rest of the yogurt, then you probably don't like yogurt, in which case, stop reading, because this is going to be gross otherwise.
If you do like yogurt, then here's the super complicated instructions.
(1) Pour milk into pot and heat to between 180-190 degrees.
(2) Remove from heat and cool milk to between 115-120 degrees. This takes about 25 minutes or exactly as long as it takes to walk my dog.

(3) After milk has cooled, add about 2 tablespoons of yogurt to milk and mix.
(4) Put pot in cozy place for 4-12 hours.
(5) Transfer yogurt to container and refrigerate.
Really, that's it. It's totally easy and delicious.
Of course, if you're anything like me, you like things to be a little more complicated because that creates a greater sense of accomplishment so here's a few more details.
The milk matters. A good, grass-fed whole milk yogurt is terribly lovely. Nonfat. Pretty wretched.
A cozy place can mean a couple of things. If I'm not planning to use the oven, I'll throw the pot in there. My oven is gas and the pilot light by itself will keep the temperature perfect for yogurt bacteria procreation. If you have an electric stove, leave the light on and it will be equally cozy.
If I'm planning to use the oven in the next few hours, then I make a little yogurt love nest. Like this:

The time range is huge (4-12 hours), because it's a matter of taste when to cut off the yogurt bugs from their yogurt making. Four hours will produce a very mild flavored yogurt. It tastes like thickened milk to me at this stage - mild and slightly sweet. At 12 hours, you'll have a very tangy yogurt (not unlike Nancy's). The timing is up to you. Just be sure not to jostle your pot too much while it's at work. Leave it be.
Yogurt made this way doesn't have any thickeners or stabilizers so it will be thinner than store bought and liquid whey will separate from the yogurt. For a thin yogurt, just stir thoroughly with a whisk when it's finished to integrate the whey and yogurt. For a thick, creamy yogurt, line a sieve with a cheesecloth (or a clean cloth napkin) and allow the yogurt to drain for 30-60 minutes.
And finally - the very coolest part. The second time you make yogurt, you can use the last dollop of yogurt from the first batch to start the new batch. Harold McGee, my favorite food scientist, has been tending the same yogurt colony for 10 years this way. I'm fascinated. It's completely gross and engrossing.
And that's it. All of it. Enjoy it however you like. I like it with granola or plain with a drizzle of buckwheat honey on top.
Subscribe to:
Posts (Atom)